Link Ads

More search type here...

March 19, 2022

How to Drive MOSFET with ARDUINO

This is example how to drive Mosfet using arduino, port to drive is port 9 as PWM can send data from 0 to 255 as analog voltage from 0 to 5V.
Video example at : https://youtu.be/-zfrnw4Iwpg


/*

Fading
This example shows how to fade an LED using the analogWrite() function.
The circuit:
(modified)
- GATE MOSFET attached from digital pin 9 to  through 100 ohm resistor.
 
created 1 Nov 2008
by David A. Mellis
modified 30 Aug 2011
by Tom Igoe
This example code is in the public domain.
https://www.arduino.cc/en/Tutorial/BuiltInExamples/Fading
*/

int ledPin = 9; // LED connected to digital pin 9
void setup() {
// nothing happens in setup
}

void loop() {
// fade in from min to max in increments of 5 points:
for (int fadeValue = 0 ; fadeValue <= 255; fadeValue += 5) {
// sets the value (range from 0 to 255):
analogWrite(ledPin, fadeValue);
// wait for 30 milliseconds to see the dimming effect
delay(30);
}

// fade out from max to min in increments of 5 points:
for (int fadeValue = 255 ; fadeValue >= 0; fadeValue -= 5) {
// sets the value (range from 0 to 255):
analogWrite(ledPin, fadeValue);
// wait for 30 milliseconds to see the dimming effect
delay(30);
}
}

November 16, 2021

Fix Error Driver for USB 2.0-serial drivers - Arduino

 This Problem is:

QA:

Hi to all at arduino

just wondering if any one can help.
i have an uno r3 and a nano pro.
the uno works great no probs, connects, uploads. really happy with it.

but when i plug the nano in to xp sp2 pc via usb, it finds new hardware but wont install the drivers. i cant find these usb 2.0-serial drivers anywhere. iv tried re-installing the ftdi drivers from arduino site but the comm port still does not show up in the ide and i still have usb 2.0-serial flagged up in device manager.

again, if any ones got the answer please help.

many thanks


Answer:

Just download this driver CH341SER  on file ZIP on this then UNZIP then do like this

1.  Open device manager

2.  Righth clik Other devices -> USB2.0 Ser   --> update driver

3. Click update driver---> find folder (driver CH341SER)

4. Find driver foler for USB2.0

5. Finis, succes to install, OK


Now your PC ready connect to USB arduino


December 8, 2017

Audio Player dengan Arduino

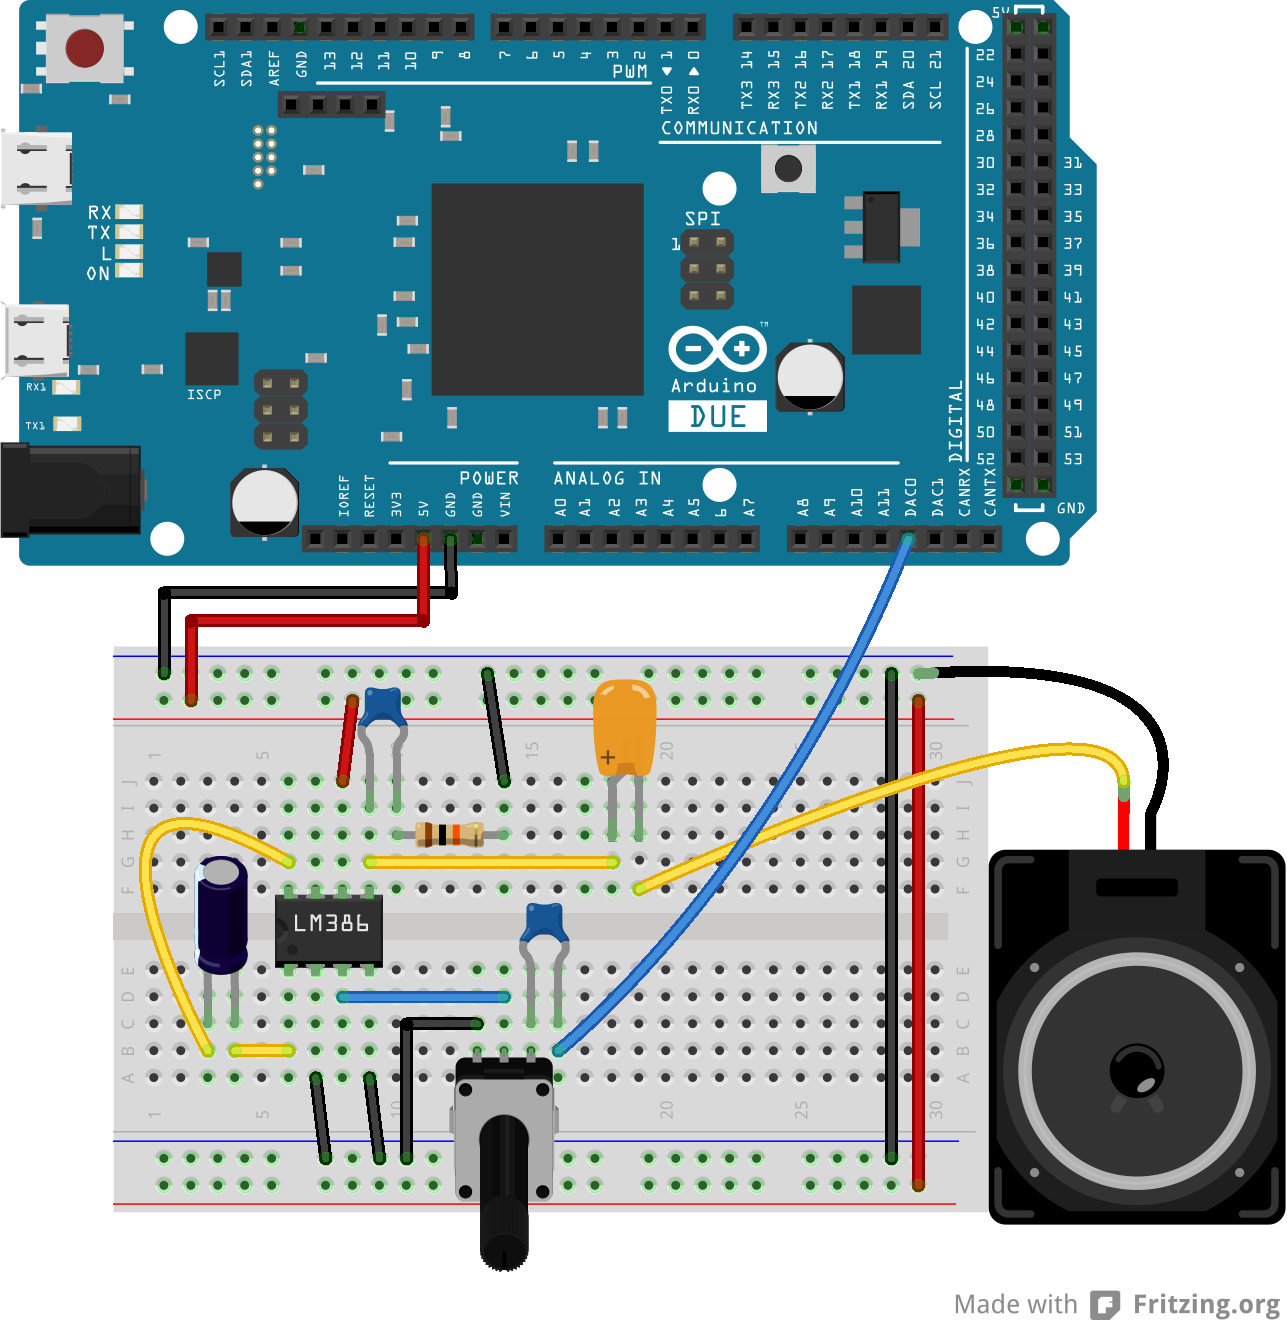
Hardware Required

  • Arduino Due Board
  • 8-ohm speaker or headphones
  • Arduino shield with an SD card with cs CS 4 (like the Ethernet shield)
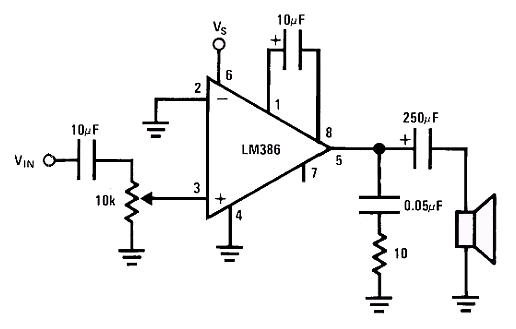
Komponen tambahan untuk bagian audio amplifier:
  • LM386 (low power audio amplifier)
  • 10 kohm potentiometer
  • 10 ohm resistor
  • 2 x 10 µF capacitor
  • 0.05 µF (or 0.1 µF) capacitor
  • 250 µF capacitor 
Skema


File Audio File

File audio disimpam di SD card format file .wav  misal diberi nama (test .wav) frek sampling 44100 Hz, 16-bit stereo quality.

Code Program:
/*
  Simple Audio Player

 Demonstrates the use of the Audio library for the Arduino Due

 Hardware required :
 * Arduino shield with a SD card on CS4
 * A sound file named "test.wav" in the root directory of the SD card
 * An audio amplifier to connect to the DAC0 and ground
 * A speaker to connect to the audio amplifier

 Original by Massimo Banzi September 20, 2012
 Modified by Scott Fitzgerald October 19, 2012
 Modified by Arturo Guadalupi December 18, 2015

 This example code is in the public domain

 http://www.arduino.cc/en/Tutorial/SimpleAudioPlayer

*/


#include <SD.h>
#include <SPI.h>
#include <Audio.h>

void setup() {
  // debug output at 9600 baud
  Serial.begin(9600);

  // setup SD-card
  Serial.print("Initializing SD card...");
  if (!SD.begin(4)) {
    Serial.println(" failed!");
    while(true);
  }
  Serial.println(" done.");
  // hi-speed SPI transfers

  // 44100kHz stereo => 88200 sample rate
  // 100 mSec of prebuffering.
  Audio.begin(88200, 100);
}

void loop() {
  int count = 0;

  // open wave file from sdcard
  File myFile = SD.open("test.wav");
  if (!myFile) {
    // if the file didn't open, print an error and stop
    Serial.println("error opening test.wav");
    while (true);
  }

  const int S = 1024; // Number of samples to read in block
  short buffer[S];

  Serial.print("Playing");
  // until the file is not finished
  while (myFile.available()) {
    // read from the file into buffer
    myFile.read(buffer, sizeof(buffer));

    // Prepare samples
    int volume = 1024;
    Audio.prepare(buffer, S, volume);
    // Feed samples to audio
    Audio.write(buffer, S);

    // Every 100 block print a '.'
    count++;
    if (count == 100) {
      Serial.print(".");
      count = 0;
    }
  }
  myFile.close();

  Serial.println("End of file. Thank you for listening!");
  while (true) ;
}